ATD Blog
Toolbox Tip: Using Lectora Variables
Thu Jul 02 2015


Begin by adding an Action to the object. Select Show as a Trigger and Modify Variable as an Action. Then, select the New Variable option from the Target drop down (see left). This prompts the Add Variable window to open where you can rename the variable and select to retain its value in between settings before selecting OK. I like this option when I have users who may enter back into the course later and shouldn’t be forced to watch each and every piece in order to get to the content they seek. I usually keep my value set to zero, because this makes the most sense to me.

Then select Add to Variable from the Type field and enter the Value of 1 (see left). I also like to think of activities as actions that build on each other, which is why I prefer to use the Add to Variable option. There also is the option to completely change the variable each time (but why do that when you can do this just as easily).
I’ll repeat the process as many times as necessary. Then move on to the next button. I like to have it initially hidden, because this way I don’t have to worry about visibility (again, one less step to consider). I’ll add an Action to the next button. Select show as my Trigger, hide as my Action, and the next button as my Target. Then select the Conditions option (see below).


You can also base the action on variables or use the Dice to randomize the movement. From here, you can select the Effect and Speed of the movement. I usually like to preview it before I make any changes.
Example 3: Call Me by Name
One of the trending ideas in instructional design and course development is that each experience should be personalized for the learner. It’s important to feel connected to the training. So, why not include their name in the narrative of a scenario?
For this example, there’s actually two ways to achieve the same goal. The first option is based on an LMS variable. This example will only work if your applying SCORM to your content and sharing it on an LMS. Begin by entering a text box that’ll be used to store the name.
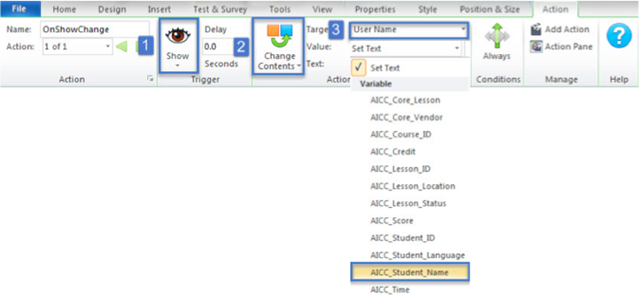
Add an Action to the text box. Select the Trigger of show, Action of change content and select the text box as the Target. From the Value drop down select AICC\_Student\_Name (see below).

One of the common goals of every e-learning developer is the ability to develop and control their courses easier and quicker. What if I told you there’s something that could speed things up for you right now? Enter Lectora’s Variables feature.
Never heard of a variable before? Variables, as defined by Trivantis, are “logical objects within a title that enable you to store, modify and test values of numbers and strings during the runtime of a published title.” This means that you can create a variable that stores or modifies based on a certain criteria and can be called upon at a later date. Awesome! Let’s take a look at some practical applications.
Example 1: The Case of the Process Explanation and Restricted Navigation
In this example, the course explains a police investigation process and was designed into a flowing narrative. The page is highly important for the user to absorb so naturally you don’t want them clicking right through it. So, to restrict the navigation to the next page until all items are selected, we’ll attach variables to the various objects on the page and require all of them to be completed before the user can continue.
Enter in that our variable we previously created is equal to 4. It’s important to pay attention to the drop down at the top of the screen. This determines whether all items or only one item needs to be completed for this action to take place.
That’s it!
Example 2: Reduce, Reuse, Recycle, and Move
The Instructional designer has come up with a great idea that when the user clicks a button the content on the page gets sorted into the right categories. This gives them a visual of how to classify the material. To keep development within Lectora the easiest method is to create an action based variable called Move.
Because the beginning trigger for this action is based on a button click, the Action will need to be attached to the button. Select On Click as the Trigger and Move as the Target. Then select the Editor icon (see below).
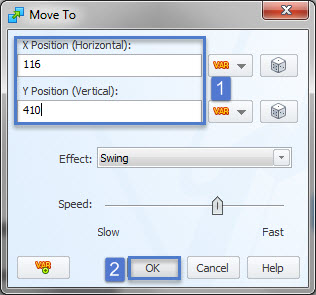
Enter in the x and y coordinates in their corresponding fields and select OK (see below).
The second alternative works if you’re not going to publish content to AICC/SCORM. For this, you’ll have to prompt the user to enter their name by creating a new Form Element called an Entry field. Each form element is automatically assigned a variable that can be found under its properties. I renamed mine for easy location and made sure to check the retain value. This means that any time the course is accessed, the variable will always show.

From here, you pick up the previous steps of creating a text box, adding the action on show change contents. Instead of calling on the LMS variable, you use the form field variable \[LearnerName\] (see left).
How do you use Lectora Variables? Share your practices in the Comments below.
You've Reached ATD Member-only Content
Become an ATD member to continue
Already a member?Sign In
More from ATD
